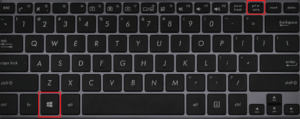
How To Take Screen Shots On Windows will be described in this article. On a PC, the desire to take a screenshot is typical. If a third-party tool is not being used, you can do the action directly. The easiest manner is to just press the Print Scrn or Prt Sc button on your keyboard, which will print the full screen of your computer. When using the Windows operating system, you do this by shoving the Print Screen key, which is situated in the upper right corner of the keyboard, to take a full computer screenshot and copy the image to the clipboard or save it to the screenshots folder.
How To Take Screen Shots On Windows In 2024
In this article, you can know about How To Take Screen Shots On Windows here are the details below;
However, there are several ways to take screenshots on Windows.
- Screenshot techniques for Windows
- This article will explain how to screenshot Windows 10 and all the procedures you must follow. We’ll also address a few important queries that the majority of users have:
- Full or minimized computer displays are available for screenshotting in Windows 10.
- How quickly can I capture a screenshot on a PC?
- utilizing the Xbox game bar to capture images and videos on Windows
- Additionally, we demonstrate in the FAQ how to snap a screenshot with Windows 11.
Windows 10 has numerous options for accomplishing this, including taking screenshots of the whole net, a specific window, or a piece of the screen. Let’s examine each one in turn.
How to Screenshot on windows 10: easy tricks
You can screenshot on Windows in the ways described below to take full or minimized screenshots:
- To take a screenshot in full-screen or minimized mode, press the print screen key.
- Take a screenshot of the computer net using the game bar on Windows, either in full or minimized mode.
- Screenshot taken by pressing Alt and Print Sc.
- Screenshot produced by Windows + Print Screen
- To grab a screenshot on Windows, use the Snipping Tool software.
- capturing a screenshot with the Snip & Sketch software.
- To grab screenshots on a PC, operate a third-party application or picture editor.
Method 1. Use the Print screen key/shortcut
The Print Screen key (Prtscn) is the simplest way to take a screenshot on a PC or computer running Windows 10. The Function (F#) keys and this button are typically found together on the top row of the keyboard. Simply shove the Windows key & the Print Screen key to take a screenshot of your full screen. A momentary dimming of your screen will signal that you’ve just taken a screenshot, and the image will then be stored to the Pictures > Screenshots folder. Let’s examine this in greater detail below:

On Windows, just type: to take a complete screenshot.
To create the precise screen you want to print an active window, press PrtScn on the upper-right side of your keyboard.
The Prt Sc button and/or Print Sc buttons on the keyboard can be used to take a screenshot on a computer. To capture the entire computer screen, press the PrtScn or Print Scrn buttons. The snapshot will be dedicated to your Clipboard automatically.
Use any tool that lets you insert images, such as Microsoft Word or Microsoft Paint, to paste the screenshot into the file and save it.
Alternately, press Windows key + Print Screen to take a screenshot of the full screen and save it instantly. When you take a screenshot, your screen will briefly become dark to let you know.
The Pictures > Screenshots folder will receive the screenshot by default.
It may be necessary to simultaneously press the Function (Fn) key & the Print Screen button on some keyboards in order to take a screenshot, as in Fn + PrtScn button/Print Scrn (print screen).
The print screen legend will take a screenshot of the whole screen & copy it to the clipboard. To see the screenshots that have been saved, look in the notifications in the lower right corner of your screen.
If you have many displays, take note that they will all be combined into one picture.
This approach copies the image to the Clipboard by default rather than saving it as a file. Once you’ve done that, you can paste the image into a document (like a Word or Google document) or an image editor (like Microsoft Paint or even Photoshop) by pressing Ctrl+V or Right-Click > Paste.
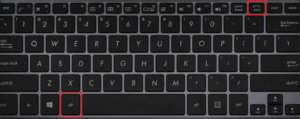
- Use the Alt + Prt Sc keyboard shortcut to print the screen if you just wish to capture one active window.
- To grab the screenshot of the active window you want, and not only any window, you will need to pick the said window by clicking on it first.
- Then press Alt + Prt Sc (print screen button) or windows key print screen
- By doing this, the picture will be copied to your clipboard, where it can be retrieved by pasting it somewhere else.
You can operate a keyboard shortcut to save the image as a file if you choose.
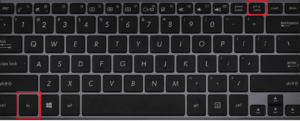
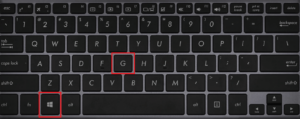
- Simply press the Windows key (the one with the Windows logo) and the Prt Sc key to print the screen. Print screen using the Windows key.
- The photograph is now saved as a file.
- It can be found by default in C: Usersuser name>Pictures>Screenshots.
Method 3: Windows Logo + print Screen Screen Capture
- Shove the Windows key + Prt Sc (print screen) on a Windows 10 computer to take a screenshot that will be immediately saved.
- The entire screen will be arrested and saved to the Pictures > Screenshots folder when your screen dims.
- Check out How to Fix the Print Screen Not Working on Windows 10 if the Print Screen button isn’t functioning properly.
Method 4. Use the Snipping Tool to take a screenshoot
If you want to personalize, comment, or share your screenshots, the snipping tool is the finest way to screenshot on Windows. An great tool for taking screenshots is the Snipping Tool app. It first appeared with Windows Vista. You could apply it to;
- Using your computer, take a screenshot of the entire screen.
- The screen’s rectangular region, or
- An unstructured screenshot.
Although there is an option to save a screenshot as an image file, taking screenshots with a snipping tool do not do so by default.
The following describes how to take a screenshot on a PC using the snip and snipping tools:
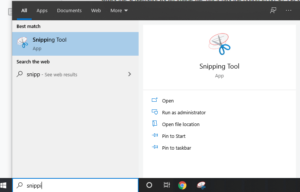
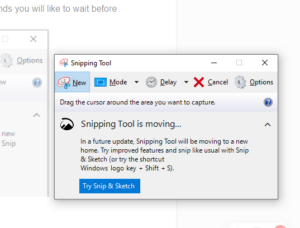
You’ll need to look for the screen snipping tool app in the search box in order to launch it. If the search bar is hidden, you may display it by right-clicking the taskbar, moving your cursor over Search, and selecting Show Search Box. The window for the active snip sketch tool will appear.
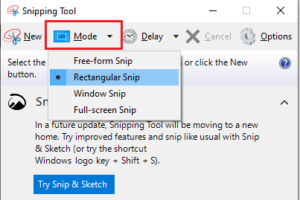
It will open a new window. Choose the mode of the “snip” you wish to take here from free-form, rectangular, window, or full-screen capture. We’ll demonstrate how to take a rectangular screen snip for you.
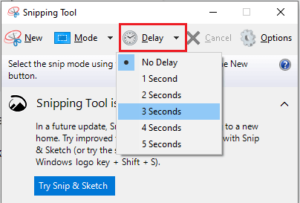
You can also delay the capture of screenshots with the Snipping Tool, enabling you to take screenshots after a predetermined period of time. Pop-up menus and tooltips can be captured with this. To specify how many seconds you’d like to wait before taking a screenshot, click delay.
Click New after you are prepared to take the screenshot. The cursor will change to a cross and the screen will eventually fade out. The screen will fade off after the number of seconds you choose if you used the delay option.
You can click and drag to make a rectangle on the screen if you choose the Rectangular screen clip mode. Your drawn rectangle will serve as the screenshot.
If the Free-form snip was chosen, you could click and draw any shape you want. Keep in mind that the screenshot will be taken as soon as you stop clicking the right mouse button.
If you chose the Window snip, you can click on the specific windows you want to capture on film.
Finally, the tool will take a full-screen snapshot of the entire screen if you click on the full-screen snip.
After taking the snapshot, you have a variety of alternatives to
By selecting File > Save as… and choosing the place you want for the file, you can save the image.
It can be forwarded as an attachment to an email or sent through email by selecting File>Send to > Email recipient.
By selecting File > Print, you can print the screenshot.
Click Edit > Copy to add the snapshot to your clipboard.
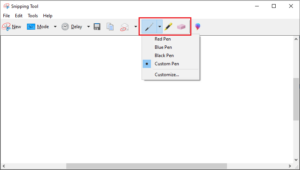
The Pen and Highlighter functions can also be used to alter the screenshot. The color of the pen is changeable. If you want to draw emphasis to a certain area of the screenshot, this is helpful.
Method 5. Using the Snip & sketch app to take a Screenshot
One of the drawing tools public to Windows users is the Snip & Sketch software (also known as the snip sketch tool). If you want to personalize, comment, or share your screenshots, the Snip & Sketch software is the best method to screenshot on Windows.
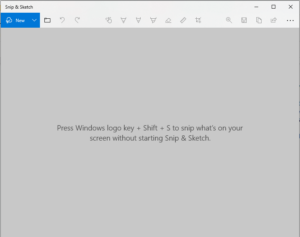
- Use the keyboard shortcut and the Windows Key + Shift + S to found Snip & Sketch, or type its name into the search box.
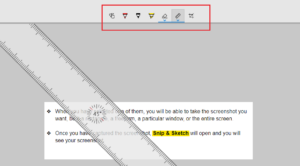
- You can choose to take a rectangular, free-form, window, or whole computer screen capture when your screen dims and a little menu appears at the top of it.
- You can pick the method you want to use to take a screenshot. These choices are identical to those in the Snipping Tool. According to left to right, they are:
- Full screen capture or Snipping, Freeform Snipping, Windows Snipping, and Rectangular PC screen Snipping.
Then, you may paste it (by hitting Ctrl+V or picking Paste from the context menu of a right-click) onto a document (like a Word or Google document) or an image editor (like Paint or even Photoshop).
A new window will popup if you search for Snip & Sketch in the search box to open it.
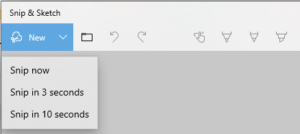
In this window, you may either click New to begin taking your screenshot or the arrow subsequent to it to Snip in 3 or 10 seconds.
When one of the options is chosen, the screen will darken and a toolbar will show up at the top. These choices are identical to those in the Snipping Tool. From left to right, they are: Full computer screen Snip, Window Snip, Freeform Snip, and Rectangular Snip.
Once one of them has been chosen, you can choose whether to take a screenshot in the form of a rectangle, a freeform, a specific window, or the entire screen.
When you launch the Snip & Sketch app after taking the screenshot, you will find it there. You can annotate with a ballpoint pen, a pencil, or a highlighter on this page. You have the option of erasing them with the eraser and adding comments at the desired angles using a ruler that can be rotated with the mouse wheel. Cropping the screenshot is an additional choice.
The buttons in the top right corner allow you to save, copy, or share the image after you’ve finished modifying it. You may select where to save the image by clicking on Save. By selecting Copy, you’ll add the image to your Clipboard, and by selecting Share, you’ll be able to email or share the image with other apps to your contacts.
taking a screenshot and saving it as a file
Use the snip drawing tool to seize a screenshot of your PC screen or to copy text or images from specific areas of the screen in Windows. Use the screen capturing tool to make adjustments or take notes, then save and share. Using the snip sketch tool, you can record any of the following kinds of snips:
- arbitrary snip
- Around an object, doodle a free-form shape.
- Slices in a rectangle
- To create a rectangle, move the pointer around the object.
- Break a window
- To capture a window, such as a dialog box, choose it.
- Complete-screen clip
- The entire screen, please.
It’s also critical to be aware that whenever you capture a snip, a copy is instantly made and saved in the Snipping Tool window for editing.
Note: Pressing Windows key + Shift + S on the keyboard will open Snip & Sketch the fastest. The Snip & Sketch tool is also accessible via the Start button’s alphabetical list of programs, and it is also displayed as Screen (full) snip in the notification panel in the lower right corner. Alternatively, if you don’t commit the keyboard shortcut to memory, you can just search for it. The software should be pinned to the taskbar if you frequently take screenshots. Also check Fix Roblox Error Code 267
Additionally, a preview notification will show up in the lower-right intersection of your screen (information panel) once you take the screenshot and it will be automatically saved to your clipboard. To alter the screenshot using the available drawing tools before saving or sharing, click the preview notice to launch the Snip & Sketch app.
Method 6. Using the Game bar to take a screenshot
The final technique we’ll go through is using the Game Bar to take screenshots. You can take screenshots, videos, and gameplay recordings using the game bar in Windows 10, in addition to a number of additional features that are not covered in this article. If you’re not playing a game, you can still take screenshots using the game bar. Learn how to utilize it here:
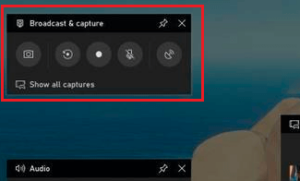
By pressing Windows Key + G (windows key G), the Game Bar overlay will appear. Before pressing, confirm that the window or screen you want to record is the active window.
Utilizing Windows’ game bar, snap a screenshot. A window with the label “Broadcast & capture” can be located in the top right intersection of the screen. Click the Camera icon to start taking a screenshot. This will create a full-screen PNG file and save the snapshot in the “C:UsersUsernameVideosCaptures” folder. Using the camera, snap a screenshot.
The game bar can help you record the screen in windows 10.
In Windows 10, the Game Bar is preinstalled. (If you’re having trouble finding it, you can download it here.) If you haven’t used it yet, it might be worthwhile to do so before attempting to record videos to make sure it’s functioning properly. to carry out
Use the keyboard’s Windows Key and G (Windows Key G). The Game Bar ought to appear as a result. If it doesn’t, here’s how to make it functional:
- Launch the Start Menu.
- Open Settings by clicking the cog symbol.
- Choose “Gaming”
- Check that the “Record game clips, screenshots, and broadcast using Game bar” switch at the top is set to On.
There are keyboard shortcuts for Game Bar commands like opening the Game Bar, taking a screenshot, and beginning and stopping a PC screen recording on the website you just opened, as well. If you want, you may ALSO create your own shortcuts for these actions and enter them here.
Now that the game bar is activated, you may start recording your screen and playing clips from your favorite games.
How to record your screen with the game bar
Remember that you can only use the Game Bar to record the screen of one active window or program at a time, which is often the window you last clicked into. Furthermore, once you begin recording, you cannot go to another window to continue. You can’t record your Desktop, File Explorer, or a few other apps, like Maps, because the game bar won’t also let you record your entire screen. If at all possible, we advise you to conduct some preliminary testing.
Here are the procedures to take in order to capture game footage and your computer’s screen using the Xbox Game Bar:
The Windows program you want to record with should be opened. To prevent inadvertently recording the incorrect one, you might need to dismiss or minimize other windows or apps. Even if the noise is coming from a different app or window, making sure it is turned off may likely help. All audio playing in all applications on the smartphone is captured by the screen recorder.
Learn how to fix the Discord screen sharing audio issue in 2023.
Input Windows key + G. The Xbox Game Bar will now be accessible.
To enable external audio recording, click the microphone icon. This will let you record a voiceover or add commentary. The internal audio recording will continue.
To begin recording, click the Record button (it has a dot in it). Instead of entering the Game Bar, you can start recording by pressing Windows + Alt + R.
In either case, a brief pop-up bar containing two recording buttons and a timer will appear.
To turn on and off your external microphone while keeping your internal microphone on and finish your recording, click the microphone button.
When finished, press Windows + Alt + R or click the stop button to end the screen capture. The screenshot will be dedicated to your computer.
The “Game clip recorded” notification will appear in the notification panel in the lower right corner; clicking it will launch File Explorer and either the “Captures” folder or the screenshots folder.
Using File Explorer is a way to searching for your recording. Access the screenshots folder or “This PC” > “Videos” > “Captures”.
If you need more details on how to capture your Windows PC screen using the Xbox Game Bar, read this article.
Method 7: Use third party app to capture screenshot on pc
You can turn to third party apps if the Windows-provided techniques are inadequate to assist you in taking quality screenshots. For Windows screenshot programs, third-party integrations are a crucial feature. They enhance the usefulness of your screen capture by allowing you to easily share between different work productivity programs and capture scrolling screens. To increase tool effectiveness and employee productivity, the print screen software from third parties integrates with a variety of project management, file-sharing, and messaging systems. Also check ps3 external hard drive
Several of the external screen capture programs are as follows:
- ShareX
- PicPick
- ScreenPresso
- Snagit
- screen capture software Apowersoft
- Droplr
- CloudApp
- Screencast-O-Matic
- Lightshot
This article explains how to use outside apps to record scrolling screens.
What the video: How to screen shot on windows 10 video
Learn how to grab screenshots on Windows 10 in How to Get Started With Windows 10.
How to screen shot on windows 11 guide
In Windows 11, there are various methods for taking screenshots. Here are four different methods to demonstrate screen capture on Windows 11.
Method 1. Take a screenshot of the entire screen with the prt sc key
On an active window in Windows 11, much like in Windows 10, press the PrtSc key. Press the PrtSc key. You won’t get a notification that the screenshot was successfully taken, but it will be saved to your clipboard. Use Ctrl-V to copy the screenshot and paste it into a word processing program, the body of an email, or another application to view it in full-screen mode.
Method 2. Use Windows Key + PrtSc key to take a full screen screenshot and save it to your compute
Hitting the Windows key along with the Print Scren keys will take a screenshot of your full desktop, but only on an open window, similar to how the PrtSc key on your keyboard does.
However, the screenshot will also be saved to a folder on your computer. If you press the right keys, your entire net will flash to indicate that the screenshot has been recorded and stored automatically.
In Pictures -> Screenshots, you may access all of your full-screen screenshots.
Method 3. Use the Snip & Sketch tool to take a screenshot of only part of the screen
Perhaps you only want to capture a specific area or open window on the computer. In this situation, Windows 11 gives you the choice to use the snip and sketch tool to capture only a portion of the screenshot:
When you press the Windows keys Win + Shift + S, a small Snipping Tool menu will appear at the top of the screen and your screen will flash.
From left to right, you can perform the following tasks with this screen:
- Draw a box around the area you wish to capture on a rectangular screen.
- Draw whatever shape about what you wish to capture using the freeform snip technique.
- Window Snip: Select a window to photograph.
- Full-screen Snip: Take a screenshot of your complete screen (similar to PrtScr).
- The screenshot will be dedicated to your clipboard when it has been taken, just like with the Prt Scr key choice.
- Once pasted, you can view it elsewhere.
The snapshot can be edited (cropped, rotated, and more) and saved to your desktop if you select the Snipping Tool preview that shows up at the bottom of the screen.
Method 4. Use the Snipping Tool to take delayed Screenshots
Like Windows Vista & the Windows 7, Windows 8, & Windows 10, the Snipping Tool is preinstalled in Windows 11. Except for a few minor upgrades, it is the same tool as the Snip & Sketch tool. Using it, To take a screenshot of a computer, enter “Snipping Tool” in the search box & then launch the program. You can choose from a combination of snips by clicking New, which will open a mini-Snipping Tool menu.
However, using the Snipping Tool in its entirety allows you to select a delay option after selecting one of the four snipping options (rectangular, freeform, window, and fullscreen). The sketch window offers three different delay options: 3, 5, and 10.
This will give you some more time to set up whatever it is you’re trying to screenshot, which can make it simpler than manually snapping the picture. By pressing Win-Shift-S, the delayed snapshot will be taken and copied to your clipboard. Additionally, you can edit or save the snapshot as a JPEG, PNG, or another file type by clicking on the preview that shows.
Final Word
That’s all, then! You now have 5 options available for how to screenshot on Windows 10. Want to snap a screenshot of your Mac computer? Learn how to snap a screenshot on a Mac by reading our post.
Join our email right away if you’re interested in learning more tips for making the most of Windows. Additionally, you receive a 10% off coupon for our store. Would you like to get offers, discounts, and promotions so you may purchase our items at the lowest possible cost? Join your email address in the container below to sign up for our newsletter. Be the first to read our suggestions for increasing productivity and receive the most recent technology news in your email.