How To Fix 100 Percent Disk Usage On Windows 11 will be described in this article. There may be times when your computer performs incredibly slowly, even if it is brand-new. When you open Task Manager to look into it, you see that your computer’s disk use is 100%. Your drive doesn’t have enough spare cycles to finish basic operating system tasks if it is under such extreme strain. If this is the case for you, you should resolve Windows 11’s 100% disk use issue. Here are some recommendations to help you deal with the issue.
How To Fix 100 Percent Disk Usage On Windows 11
In this article, you can know about How To Fix 100 Percent Disk Usage On Windows 11 here are the details below;
How to quickly fix 100 Percent Disk Usage on Windows11?
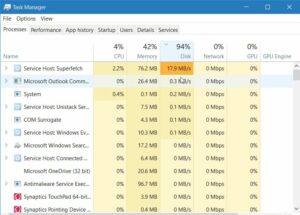
One easy way to identify the program or service that is consuming all of the disk space is to use Task Manager. You may select Task Manager by doing a right-click on the Start menu. Next, select the heading of the Disk column to see what’s consuming the most resources. From there, you’ll know just where to start. But the issue can be more significant than simply uninstalling an app or canceling a service. Therefore, please keep reading to learn about more likely sources of the issue and how to resolve them.
Disable Superfetch
The Superfetch feature, often referred to as SysMain in Windows 11, speeds up app loading and shortens boot times by reading a prefetch file. It is a helpful feature that speeds up performance, but it could also require a lot of disk space. Follow these procedures to deactivate Windows 11’s Superfetch (SysMain):
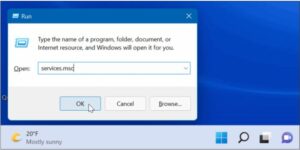
- Use the Windows key + R shortcut to open the Run dialogue.
- Type services.msc into the Run box & click OK.
- Double-click SysMain and select the Stop option after the Services panel opens.
- Next, choose Disabled from the choice next to the Startup type
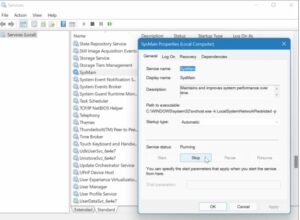
- To close the Services console, click Apply and OK.
SysMain should have paused, and you should see a difference in Task Manager’s Disk Usage; but, to resolve the issue, you must restart your computer.
Rebuild Search Index
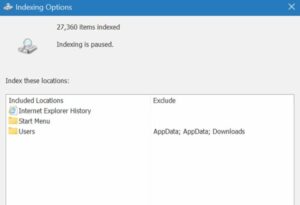
Search indexing is another common issue associated with Windows 11’s excessive disk use. Search indexing looks through files, emails, pictures, and other system files on your computer to deliver search results more quickly. Something going wrong could lead to an endless cycle of searches. But you could rebuild the database and fix it. Complete these procedures in order to rebuild the search index:
- Type “indexing options” into Start, press the Windows key, and choose the first result.
- Click the Advanced option when the Indexing Options window shows up.
- To ensure 100% disk usage, select the Rebuild option under the Troubleshooting section and press OK to validate.
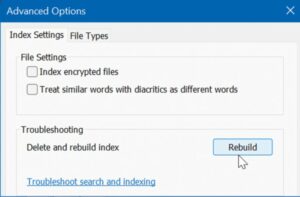
You should step away from your computer for a while as this process could take some time. Depending on the speed and data capacity of the drive—that is, SSD vs. HDD—the time needed may change.
Disable Search Indexing Completely
You can disable search indexing entirely if the rebuild functions properly but you find yourself needing to do it frequently. To turn off Windows Search, take these steps:
- Use the Windows key + R shortcut to open the Run dialogue.
2 – Type services.msc into the Run box & click OK.
- To access the Services console, double-click Windows Search.
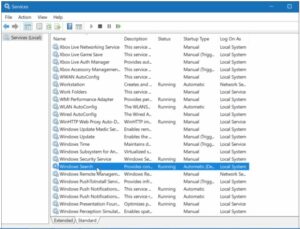
- Choose Disabled as the Startup type when the Windows Search Properties window appears.
- Click Stop and then OK.
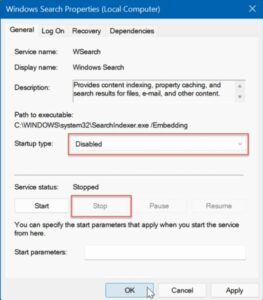
You can now disable search indexing and it won’t work if you restart your computer. Also check Ways To Fix The Most Common Netflix Issues
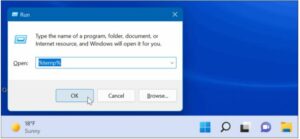
Delete Temporary Files
On Windows 11, deleting any leftover temporary files will resolve 100% disk use issues. These files may cause an excessive amount of storage stress. To delete temporary files from Windows 11, take the following actions:
- Use the Windows key + R shortcut to open the Run dialogue.
2 – Type %temp% into Run and click OK.
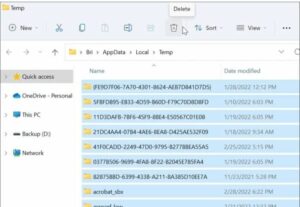
One way to achieve 100% disk use on Windows 11/3 is to enter the Temp folder in File Explorer, select all items within it using Ctrl + A, and then pick the Delete button from the toolbar.
Disable DiagTrck Service
In other words, Microsoft receives data on your PC activity from the Connected User Experiences (DiagTrack) service, also referred to as Telemetry data. This service runs in the background. Thus, it could be the cause of a high proportion of disk consumption. To stop the DiagTrack service, take the following actions:
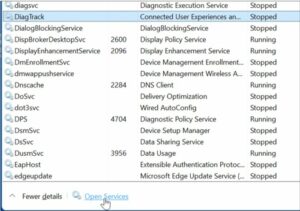
- Use Ctrl + Shift + Esc to open Task Manager and choose the Services tab.
- From the menu, right-click DiagTrack and choose Stop.
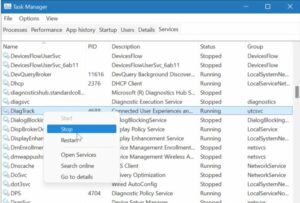
- Next, select Open Services from Task Manager’s bottom menu.
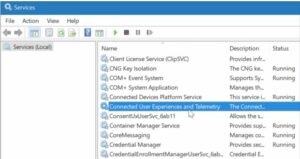
- When the Services box opens, double-click the Connected User Experiences and Telemetry service.
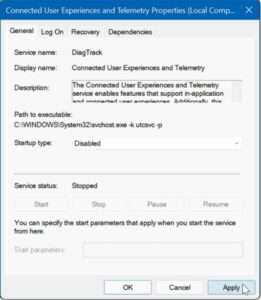
- Click Apply after changing the Startup type to Disabled on the General tab.
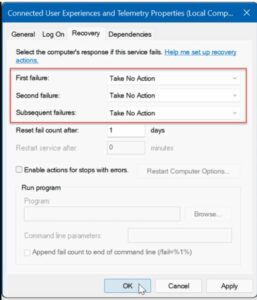
- Choose the Recovery tab, click OK, and select Take No Action for each of the three failure choices.
As the service has been disabled, you don’t need to worry about it continuing to operate when your computer restarts.
Check Malware
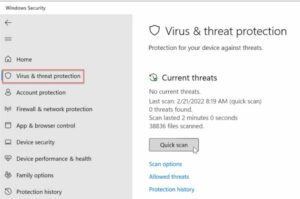
Viruses and/or other malware should be checked for as well. This is very important. Windows Security, formerly known as Windows Defender, is an integrated program that scans your computer for malware on a regular basis. But it could only be able to record certain items. By doing the following actions, you can manually do a virus scan:
1 – Click Start, press the Windows key, type “windows security,” and select the first option that appears.

- Select “Virus & threat protection” from the menu on the left, then press the “Quick scan” option.
- Do a more thorough scan if nothing is discovered and your disk usage is still 100%. To accomplish this, click the Scan options link, then select Microsoft Defender Offline scan or Full scan.
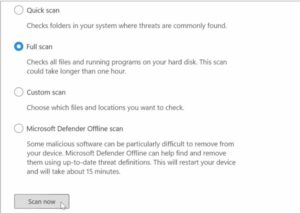
It takes longer to perform a more complete scan, but if your PC is infected with persistent malware, the wait will be worthwhile. Close any open files before starting an offline scan because it will restart. Getting a second opinion is also very important. Run a scan on any file you’re unsure about with a reliable, free security program like Avast or AVG AntiVirus. Also check How To Fix Instagram Links Not Working
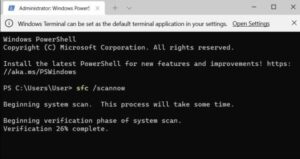
Run SFC and DISM Scan
In Windows, corrupted or missing files may cause a high disk load while your computer tries to make up for it. Thankfully, Windows comes with a few programs that can assist you in searching for faulty files and replacing them with original ones. Use these tools by doing the following actions:
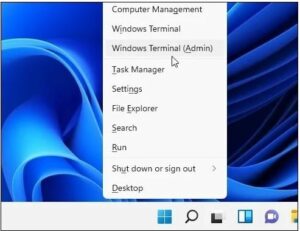
- Right-click on the Start menu and select Windows Terminal (Admin).
- Type the following command into the terminal and hit Enter:
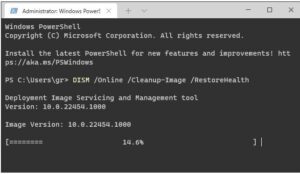
- After the DISM command is complete, type and hit Enter the following command:
Check Hard Disk for Error
Examining the disk for errors is another way to fix Windows 11’s 100% disk usage issue. You can use these steps to inspect the disk for errors:
- Type powershell into the Start menu.
- Hover your cursor over the top result and select “Run as Administrator.”

3-Type the following command and hit Enter when the terminal window opens.
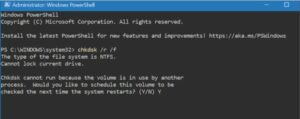
4 – To schedule the scan for the next time your computer reboots, type Y when prompted and hit Enter.
Conclusion:
One of the above-mentioned fixes may be helpful if you’re experiencing 100% disk usage on Windows 11.