Have you ever met iPhone frozen or stuck issues? While iPhone is one of the most secure and feature-rich devices, the chances of system issues over time can’t be ignored. Some users may suddenly face situations like and needs an effective solution. So, what will you do?
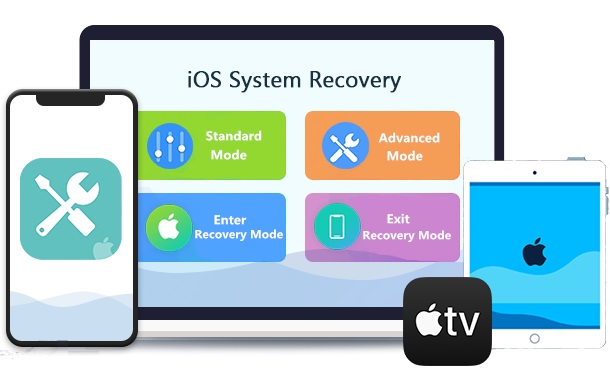
All you need is innovative and effective iOS system recovery that can be used for all models of iPod, iPad, iPhone, etc. Dr.Fone System Repair can fix over 150 kinds of iOS system issues on all iOS devices without the need of any external help.
Not only this, it can actively support upgrading to the latest iOS 16 version. Let us know all details about Dr. Fone System Repair, starting with a quick definition.
What is Dr.Fone System Repair?
It is a dedicated toolkit offering a range of solutions to iPhone stuck on Apple logo, iPhoen stuck in recovery mode, White screen of death, iPhone black screen, iPhone frozen, iPhone keeps on restarting, etc. It helps users regain proper control of the device while protecting the data at its best.
So, it actively eliminates the need for different specialist solutions, as all possible system repair issues can be resolved using it only. Isn’t Dr.Fone System Repair look like a miracle tool for iPhone users? If you’re already in love with it, wait as the next in line are some of its key features:

Features of Dr.Fone System Repair for iOS:
Dr.Fone System Repair for iOS comes with multiple features for seamless, easy, and overall iPhone system repair management. Some of the useful features of the Dr.Fone System Repair (iOS) tool include the following:
- Compatible with all iOS device families: It works seamlessly on iPhone 14 series, the latest iOS 16, and all iOS device families.
- User-friendly: No need to scratch your head in repairing your iOS system, as Dr.Fone System Repair is easy to use. Further, it has a simple process and offers effective results.
- Actively supports iOS downgrade or update: Fone System Repair actively supports iOS system downgrade or update without additional hassles.
- Repairs more than 150 system issues: It can handle more than 150 different system issues.
- Ensures data safety: All compatible devices like iPhones, iPods, and iPad can be quickly repaired without any data loss using Dr.Fone System Repair.
How to use Dr.Fone System Repair to fix iPhone issues?
After going through the key features of Dr.Fone System Repair, it is time to go through the detailed steps to use this tool. Let us explore the two cases of this effective tool in iOS system repair one by one:
Situation 1: Steps to Exit Recovery Mode using Dr.Fone System Repair:
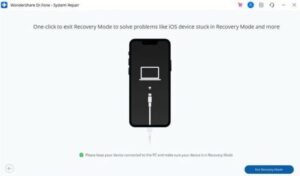
Exiting the recovery mode using Dr.Fone System Repair is one of the highly convenient features of this tool. You may have to put your iPhone in recovery mode for repairing its system issues. Now is time to exit this recovery mode. Let us go through the detailed steps for these functions in details:
1. Launching and selecting iOS repair: Launch the Dr.Fone System Repair and select the “System Repair” option. Now, connect iPhone to the system and select the “Toolbox Repair” option.

2. Selecting Exit Recovery Mode option: Now, select the “Exit Recovery Mode” option to bring your iOS back to normal.
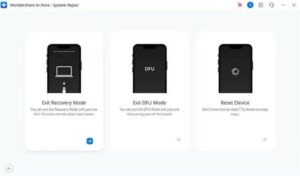
3. Clicking on Exit Recovery Mode: Now click on “Exit Recovery Mode” as displayed on your screen.
Situation 2: Steps to Repair System Issues using Dr.Fone System Repair:
Dr.Fone System Repair is the highly professional and easiest iOS system repair tool. Users can follow the given steps to use this tool are:
1. Launching Dr.Fone System Repair: Go to the official website of Dr.Fone System Repair and download the tool. Now, launch it on your computer and select the “System Repair” option on its homepage.

2. Selecting the Smartphone type: The next step is to select the type of smartphone you’re looking to repair. You can quickly select “iOS” as iPhones.

3. Selecting iOS repair: Now the interface will open, showing different options for iOS smartphones. You can select the “iOS Repair” option to start repairing the system issues.

4. Selecting the issue type: Next, it is easy to locate the specific issue on your device from the total list of iPhone issues handled by Dr.Fone System Repair (iOS). You can select the issue type, or even if your iOS system issue is not available in the list, go ahead with the “Repair Now” option.

5. Selecting the Standard Repair or Advanced Repair: The next step is to select from the “Standard Repair” or the “Advanced Repair” option. Here, the “Standard Repair” option fixes all iOS issues by retaining device data. The “Advanced Repair” mode fixes the iOS issues but erases the device data. Hence, we’re going ahead with the “Standard Repair” option only and suggest using the “Advanced Repair” option if the first option fails to repair your iPhone.

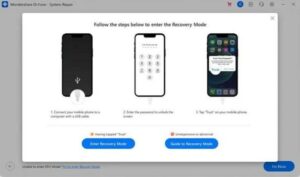
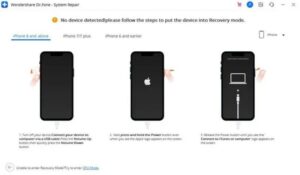
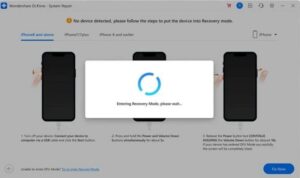
6. Putting iPhone in recovery mode: Now, you must put your iPhone in recovery mode. Connect your iPhone to the system using a USB cable and follow the screen instructions. Click on the “Trust” option and then the “Enter Recovery Mode” option. You can go to “Guide to Recovery Mode” if your iPhone is acting abnormally or is unresponsive.
7. Following the instructions: Keep on following the screen instructions.
8. Automatic detection: Fone System Repair will automatically detect your device.
9. Selecting the iOS firmware type: Now, select from the available iOS firmware type available in the list and click on the “Download” option.
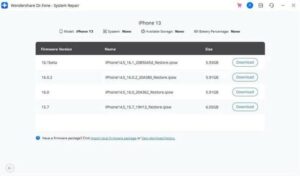
10. Downloading the firmware package: The progress of the firmware package will be shown on the screen. Then, the platform verifies the iOS firmware version to eliminate any issues.

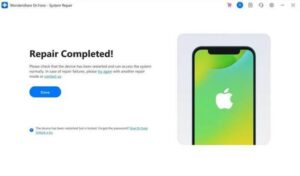
11. Starting iOS system repair: Once the firmware is verified, the next step is to click on the “Repair Now” option.

12. System repair completion: All you need to do now is click on the “Done” option to complete the execution of the iOS system repair.
Why choose Dr.Fone System Repair?
After learning about the detailed steps to use Dr.Fone System Repair for repairing system issues or entering or exiting recovery mode, you may look for its exclusivity.
Out of all the possible options available to iPhone users, Dr.Fone System Repair is the perfect solution for different situations, including iPhone stuck on the Apple logo:
- Easy and quick iOS recovery: iPhone users don’t need to worry about considering the high costs of fixing their device as Dr.Fone System Repair can be used easily within ten minutes only.
- Freedom to select repair modes: There is no need to settle for a one-fit-for-all repair option as Dr.Fone System Repair is available in two different modes- standard mode, advanced mode.
- Dedicated customer support: It offers impressive customer support to users with searchable help for different repair or recovery process stages. Further, users can reach Dr.Fone’s customer support through a chatbot, email, or call.
Conclusion
Hope everything is clear to our readers about the amazing tool Dr.Fone System Repair. It is the perfect solution for iOS problems like iPhone stuck on the Apple logo, etc. It is easy to go through its key features and detailed steps to make it a perfect iPhone system repair or recovery tool.
As a complete mobile solution for iOS devices, Dr.Fone System Repair has many benefits for mobile users looking for quick iOS system recovery. Not to miss is its ease to use, which makes it a go-to device for beginners and experts.
Further, users have the availability to download Dr.Fone System Repair for other operating systems also.